Introduction #
Zones allow players to measure and submit times to the leaderboards.
This guide focuses on zoning using Momentum Mod’s in-game tool.
Zoning using Hammer is briefly covered in this section
Glossary #
| Term | Definition |
|---|---|
| Track | A timed part of the map with a start and an end, and a leaderboard for players to compete on. |
| Main Track | The main track of a map. Every map has exactly one Main Track. |
| Bonus Track | A Track distinct from the Main Track, often shorter than the Main Track. |
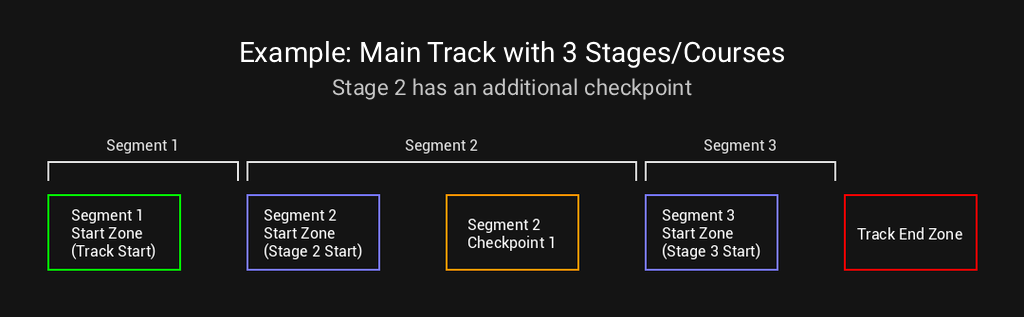
| Segment / Stage / Course | A section within the Main Track which has its own leaderboard. |
| Zone | A trigger that controls the run timer when players enter or exit it. |
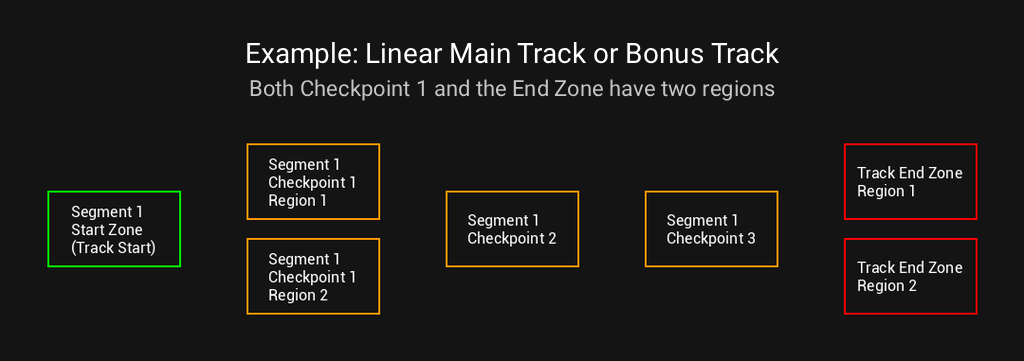
| Region | A volume component of a Zone. Each Zone is made of one or more Regions, which may be in different areas. |
| Checkpoint | A type of zone used within a Segment that activates a timer split when touched; it does not save progress. |
| Global Region | A special type of region that applies to all tracks; some manipulate more than just the timer. |
| Region Teleport Destination | The location and rotation the player is teleported to when using a command to restart or change tracks. |
Examples #
General Guidelines #
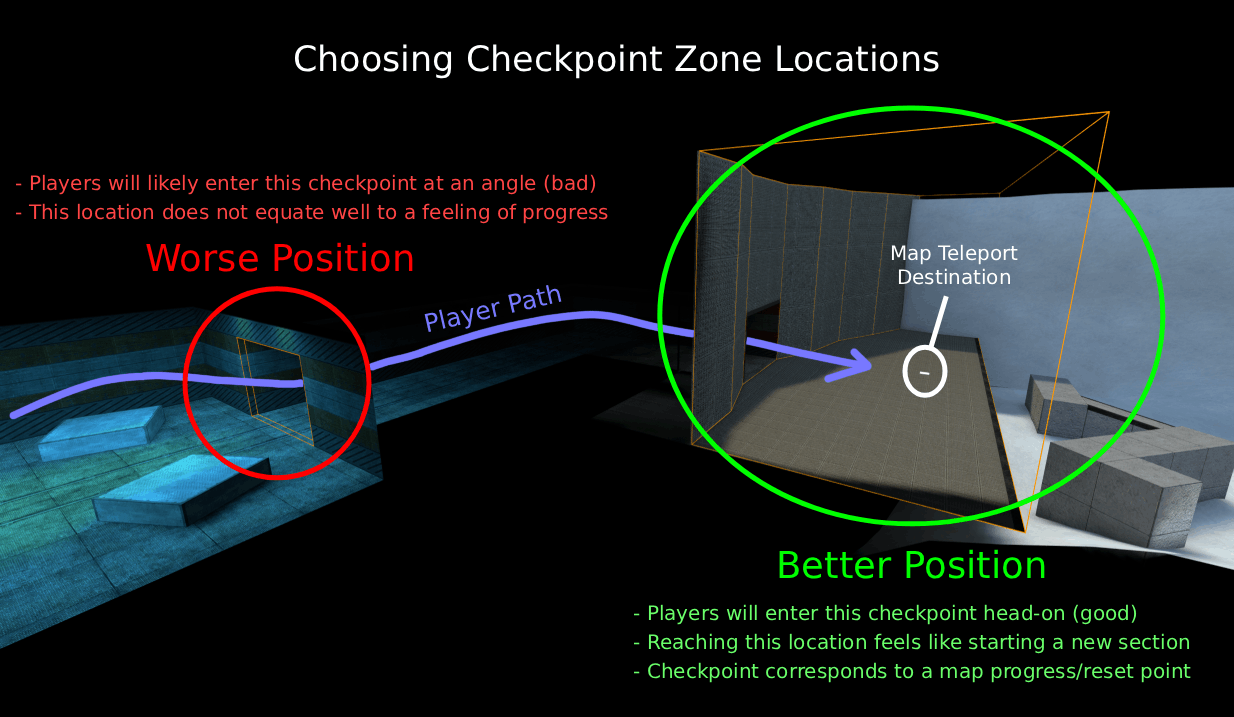
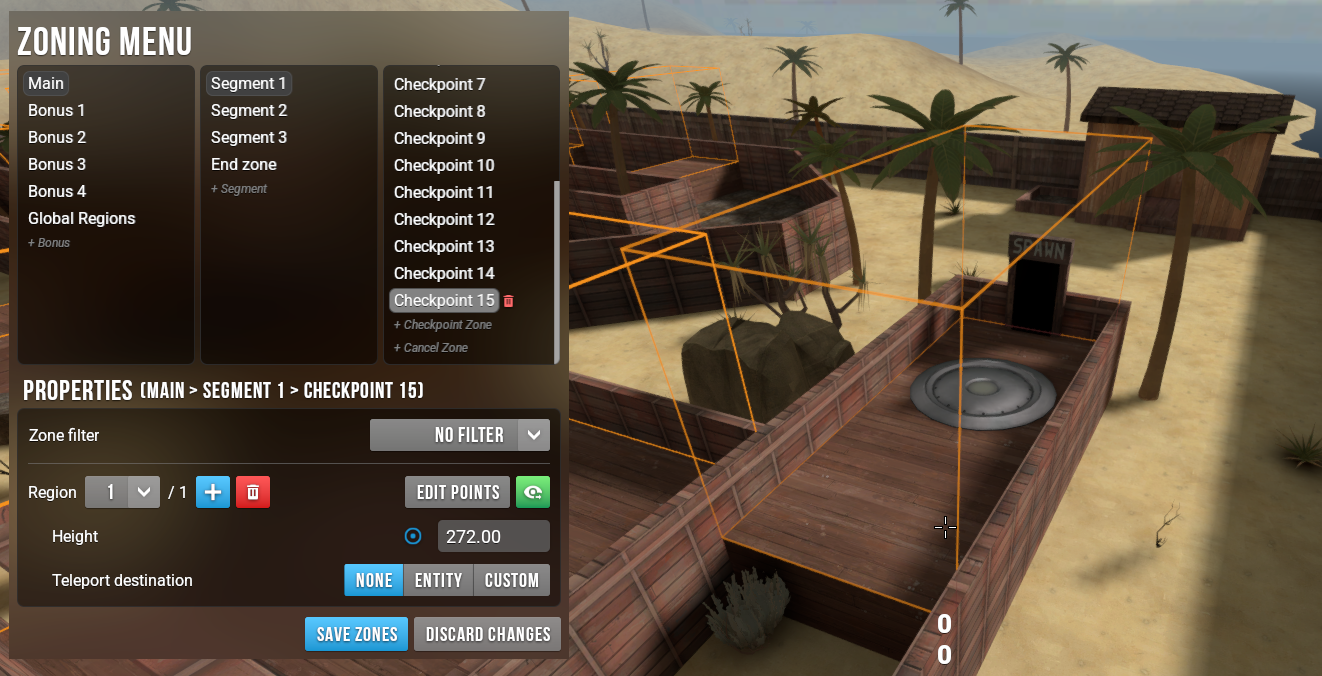
Checkpoint placement #
Checkpoints should be placed in a way that provides the most consistant time comparison
- Place checkpoint in the middle/end of hallways rather than right after a turn
- Place checkpoints at the bottom of drops rather than at the top
Zone Height #
- If the zone is right under a ceiling, it should extend all the way up to it
- If there is no ceiling above, the zone should be at least 256u tall
- Zones can be taller than that if it fits the geometry of the map better
- Start zone’s height should be set based on gameplay and timing needs
- Unless there is a reason, it should also follow the guidelines above
- End zones that the player has to fall into can be as short as 1u
Setup #
- Open console (~ by default, key below ESC)
- Type
sv_cheats 1 - Press Tab to open leaderboards
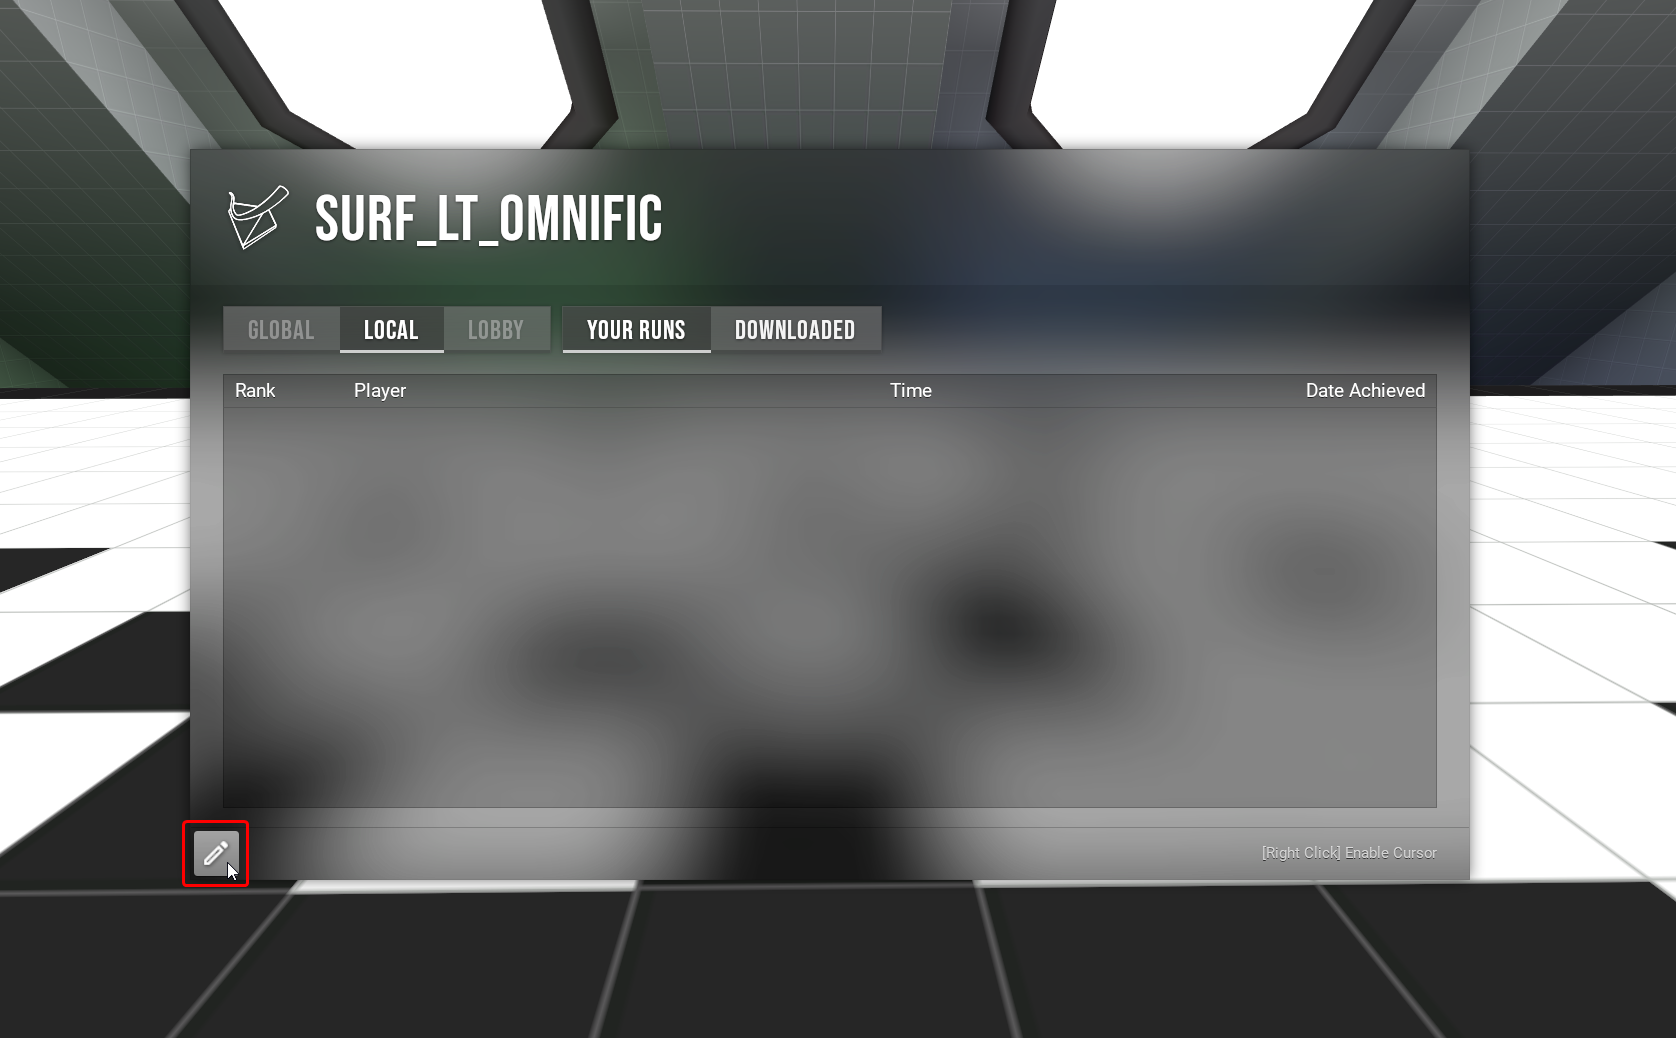
- Right click to get mouse control and click the button in bottom left
- You also open this menu with
mom_zoning_enable 1in console
- You also open this menu with
You can right click to toggle mouse control while the zoning menu is open
All zones will be saved to /momentum/maps/zones/local folder.
You can access it by Right Clicking Momentum Mod in your steam library and selecting Manage → Browse local files
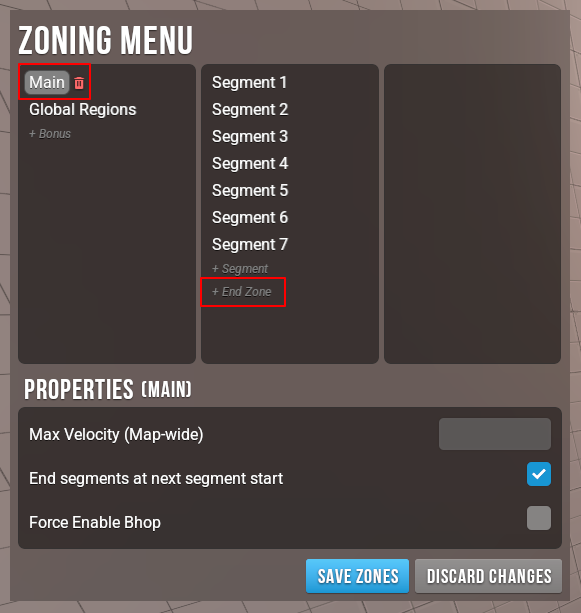
Basic information #
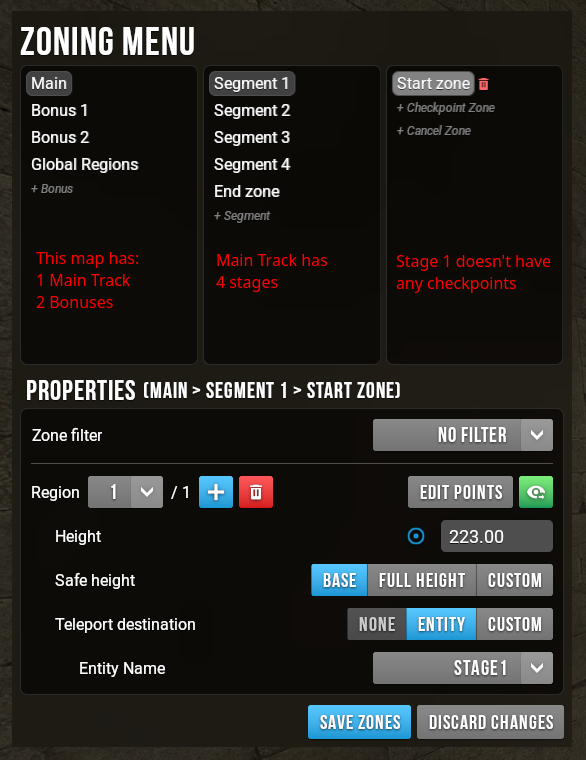
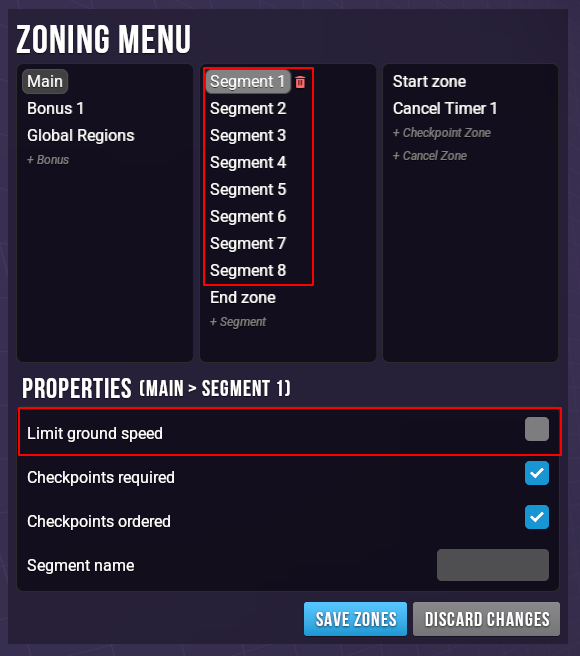
Zoning menu is split into 4 sections
Left section #
This section is for creating the main track, bonuses, and global regions.
Main track can have multiple segments
Global Regions always affect the player, no matter what track they are playing on.
Middle section #
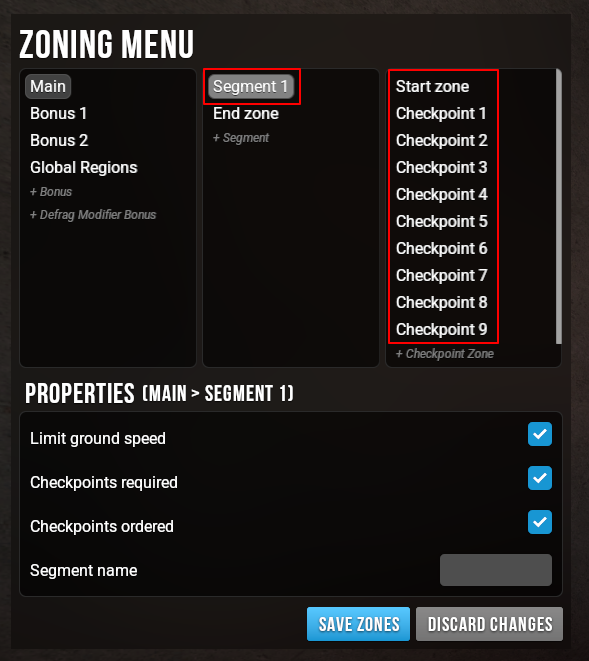
This section is for creating segments ( stages in Surf, courses in RJ/SJ ) and the end zone.
Every segment measures time for comparisons and has it’s own leaderboard!
Every segment can have it’s own checkpoints.
Right section #
This section is for creating checkpoints.
Checkpoints measure time for comparisons but don’t have leaderboards.
Bottom section #
This section lists additional properties of zones.
They are covered later in the guide.
Basic Zoning #
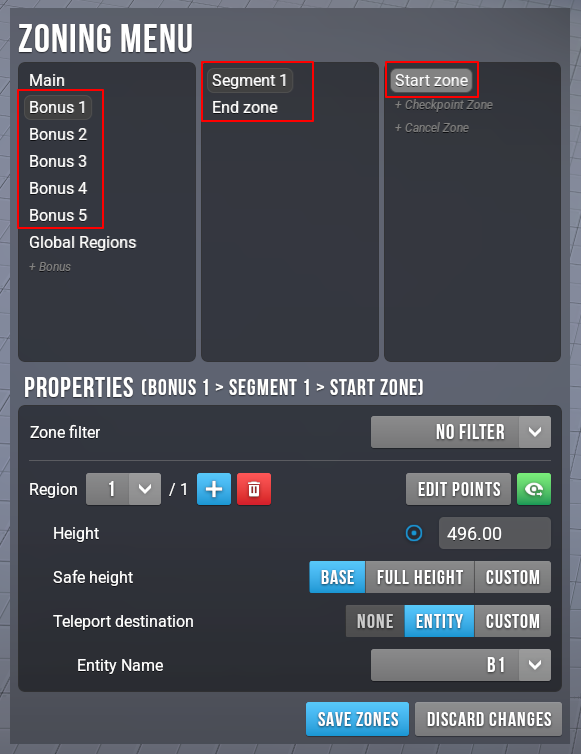
Creating the Start Zone #
Every segment needs a start zone.
Every start zone needs to have an associated teleport destination entity
- Entities defined by the mapper should always be used if they exist. They will be chosen automatically when creating a zone encompassing them.
- Entities should always be encompassed by the start zone
- Go to the start of the map
- Click + Main
- This will automatically create the main track, segment 1 and put you in the zone edit mode
- Select one corner of the starting platform
- The zoning tool will automatically detect vertices and snap to them ( blue indicators in the video below )
- Make sure you are always snapping to vertices if possible
- Select the opposite corner of the starting platform
- If the platform you’re zoning is not rectangular see the Freeform Mode section
- Choose the height of your zone ( please follow the zone height requirements)
- The entity will turn green when encompassed by the region
- The entity is usually above any starting platform ( grey box in the video below )
- If necessary, change the Safe Height of your zone
Start zones should always use teleport destination entities defined by the mapper when they exist.
Zoning non-rectangular platforms: Freeform Mode.
Zoning in mid-air: Box Mode.
You can always Edit Zones after creating them.
Creating Segments and Checkpoints #
Segments and Checkpoints are used differently depending on the gamemode.
Please follow the guide appropriate for your map.
When zoning multiple routes or around a hole in geometry instead of creating extra zones, you should be adding Additional Regions to a single zone.
On Surf maps, make sure to create Allow Bhop zones where necessary.
- Surf: Linear / Bhop
- Surf: Staged
- Surf: Staged-Linear
- RJ / SJ / Conc: No Courses
- RJ / SJ / Conc: With Courses
- Other Gamemodes
Surf: Linear / Bhop #
Linear Surf / Bhop maps should have 1 segment and checkpoints placed throughout the map for comparisons.
Example: surf_atonement zonesCheckpoints should generally be at least 10s apart
- This does not have to be very precise, it’s fine to place checkpoints at longer intervals if that fits the gameplay better.
- You can watch WR videos and place checkpoints in approximate spots
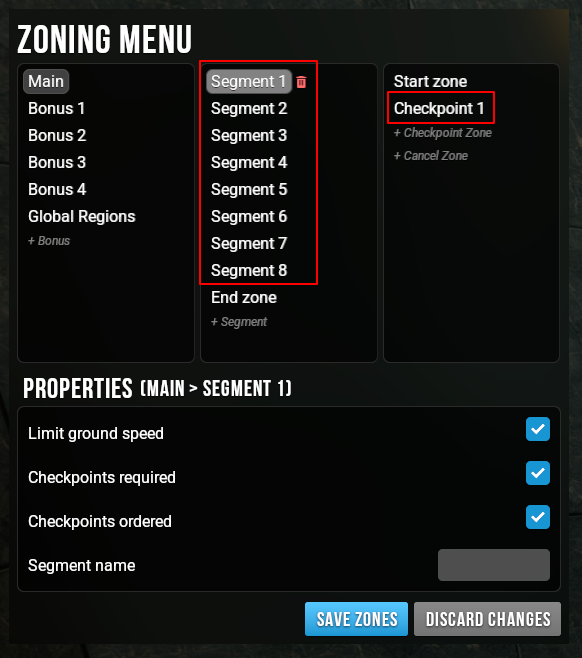
Surf: Staged #
Staged Surf maps should have a seperate segment for every stage.
Segments for very long stages can have additional Checkpoints added within them for extra timer splits when comparing runs.
Example: surf_tuscany zones
Surf: Staged-Linear #
Staged-Linear Surf maps should be zoned mostly the same way as Staged Surf maps.
The only exception being that Limit Ground Speed needs to be unchecked for every segment.
Example: surf_anzchamps zones
RJ / SJ / Conc: No Courses #
Rocket / Sticky Jump maps without any courses should have 1 segment and a checkpoint at the start of every jump.
Example: rj_summer zones
RJ / SJ / Conc: With Courses #
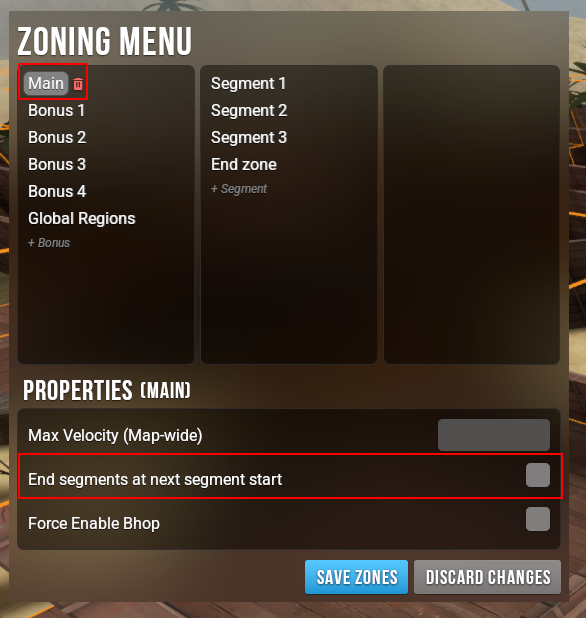
Rocket / Sticky Jump maps usually teleport the player back to the hub upon completion of a course.
This guide applies only to maps that require courses to end before the start of next course.
If the next course starts at the same spot where the previous course ends, don’t change the main track property and don’t add checkpoints to the end of courses.
If you have any questions please ask in #map-porting channel on our Discord.
- Uncheck End segment at next segment start in main track properties
- This will make the time submit when the player enters last checkpoint on a course except for the last course
- Last course time will always submit when player enters the End Zone
- For every course except last:
- Create a new segment at the first jump
- Add a checkpoint to the start of every jump
- Add a checkpoint to the end platform ( before being teleported to the hub )
- For the last course:
- Create a new segment at the first jump
- Add a checkpoint to the start of every jump
- Do not add a checkpoint to the end of this course
Example: rj_deserted zones ( notice that the end of course 1 is zoned with a checkpoint )
Other Gamemodes #
Vast majority of maps for gamemodes other than those described above will use a single segment with checkpoints.
That means they should be zoned identically to Surf: Linear / Bhop maps.
In Defrag, checkpoints should be set as not required by default.
That doesn’t mean however that their placement is less important.
Checkpoints are the most useful when they cannot be skipped and so even on Defrag maps you should do your best to ensure that is the case.
There exist exceptions, where checkpoints can be used to gate progress, however other methods are generally preferable ( e.g. filters or collectibles )
Of course there are exceptions to this rule.
There is nothing stopping maps for other gamemodes to be staged.
The reason they are not is simply because of the way different communities create and play maps.In case you encounter these exceptions, apply your best judgement to which method of zoning from above to use.
When in doubt, don’t hesitate to ask for help in #map-porting channel on our Discord.
Creating the End Zone #
Creating the End Zone is as simple as creating any other zone.
Click on +End Zone below segments of the track you’re zoning to create it.
Every track can have only One End Zone.
If the track needs to end in multiple separate areas, add Additional Regions to the End Zone.
In other games End Zones might be pushed back a couple units from the edge of the platform.
This is the case because of a bug that allowed players to activate the zone by hitting the side of a platform without landing on it.
This bug is fixed in Momentum Mod.
When creating End Zones make sure they are snapped to vertices like any other zone.
Creating Bonuses #
Creating Bonuses is the exact same process as creating the Main Track.
Start By clicking on +Bonus to create it.
Bonuses are essentially short, linear maps.
Follow the same principles as in Surf: Linear / Bhop or RJ / SJ / Conc: No Courses zoning.
For bonuses on Defrag maps which are copies of the Main Track but with additional gameplay modifiers read the Defrag Modifier Bonuses section.
Example: surf_technique zones
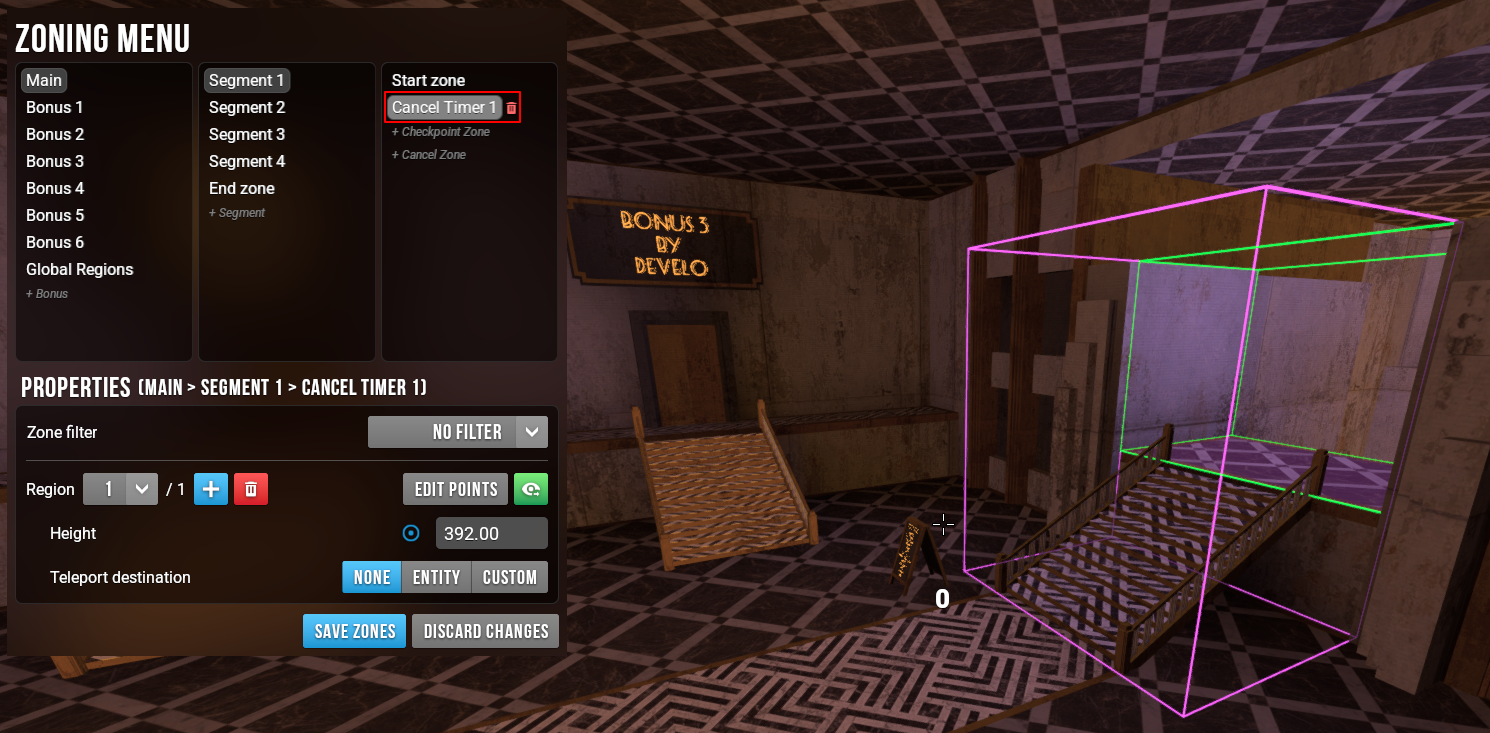
Creating Cancel Zones #
Cancel zones automatically stop the active timer when entered.
They are used for two main reasons:
-
Preventing hub abuse
Some maps place teleports to each stage inside the hub.
Without a cancel zone, players could go back to the hub from the start zone, trigger zones on every stage, and finish only the last one to submit an invalid time. -
Allowing for clean track switching
On some maps, players can walk between the main track and bonuses without noclip.
A cancel zone between track start zones ensures players can switch to a different track by just walking to it, instead of using a teleport command.
Cancel zones can either be global or per segment.Example: surf_bugs zones ( a cancel zone is stopping player’s timer before walking into bonuses )
Setting Zone Properties #
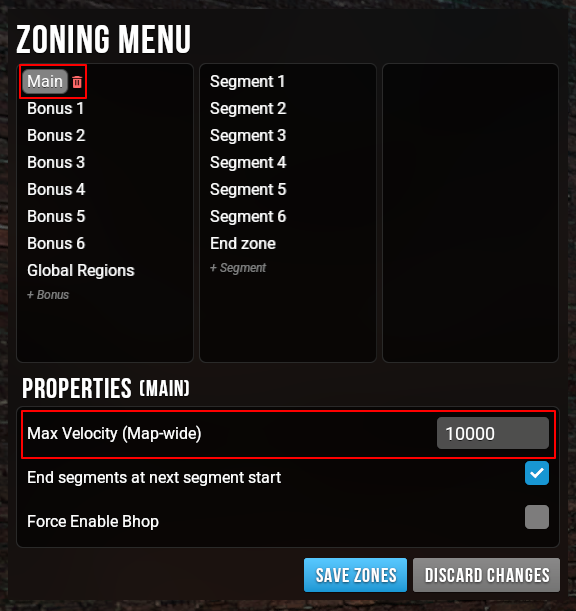
Max Velocity #
This setting changes maximum allowed velocity on the entire map ( not only the main track ).
- Empty Field: Uses gamemode defaults
- Value is 0: Uncapped velocity
- Any other value: Caps maximum velocity to that value
You have to press Enter after inputting Max Velocity, otherwise it won’t save.
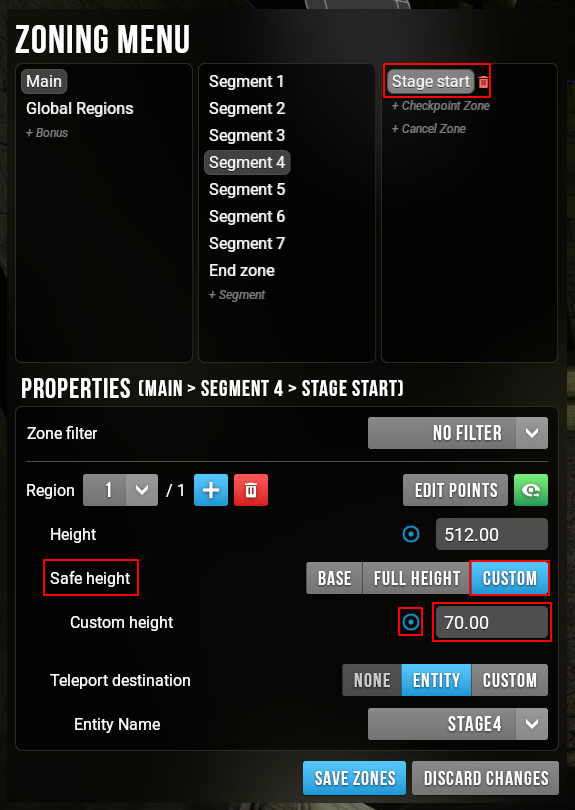
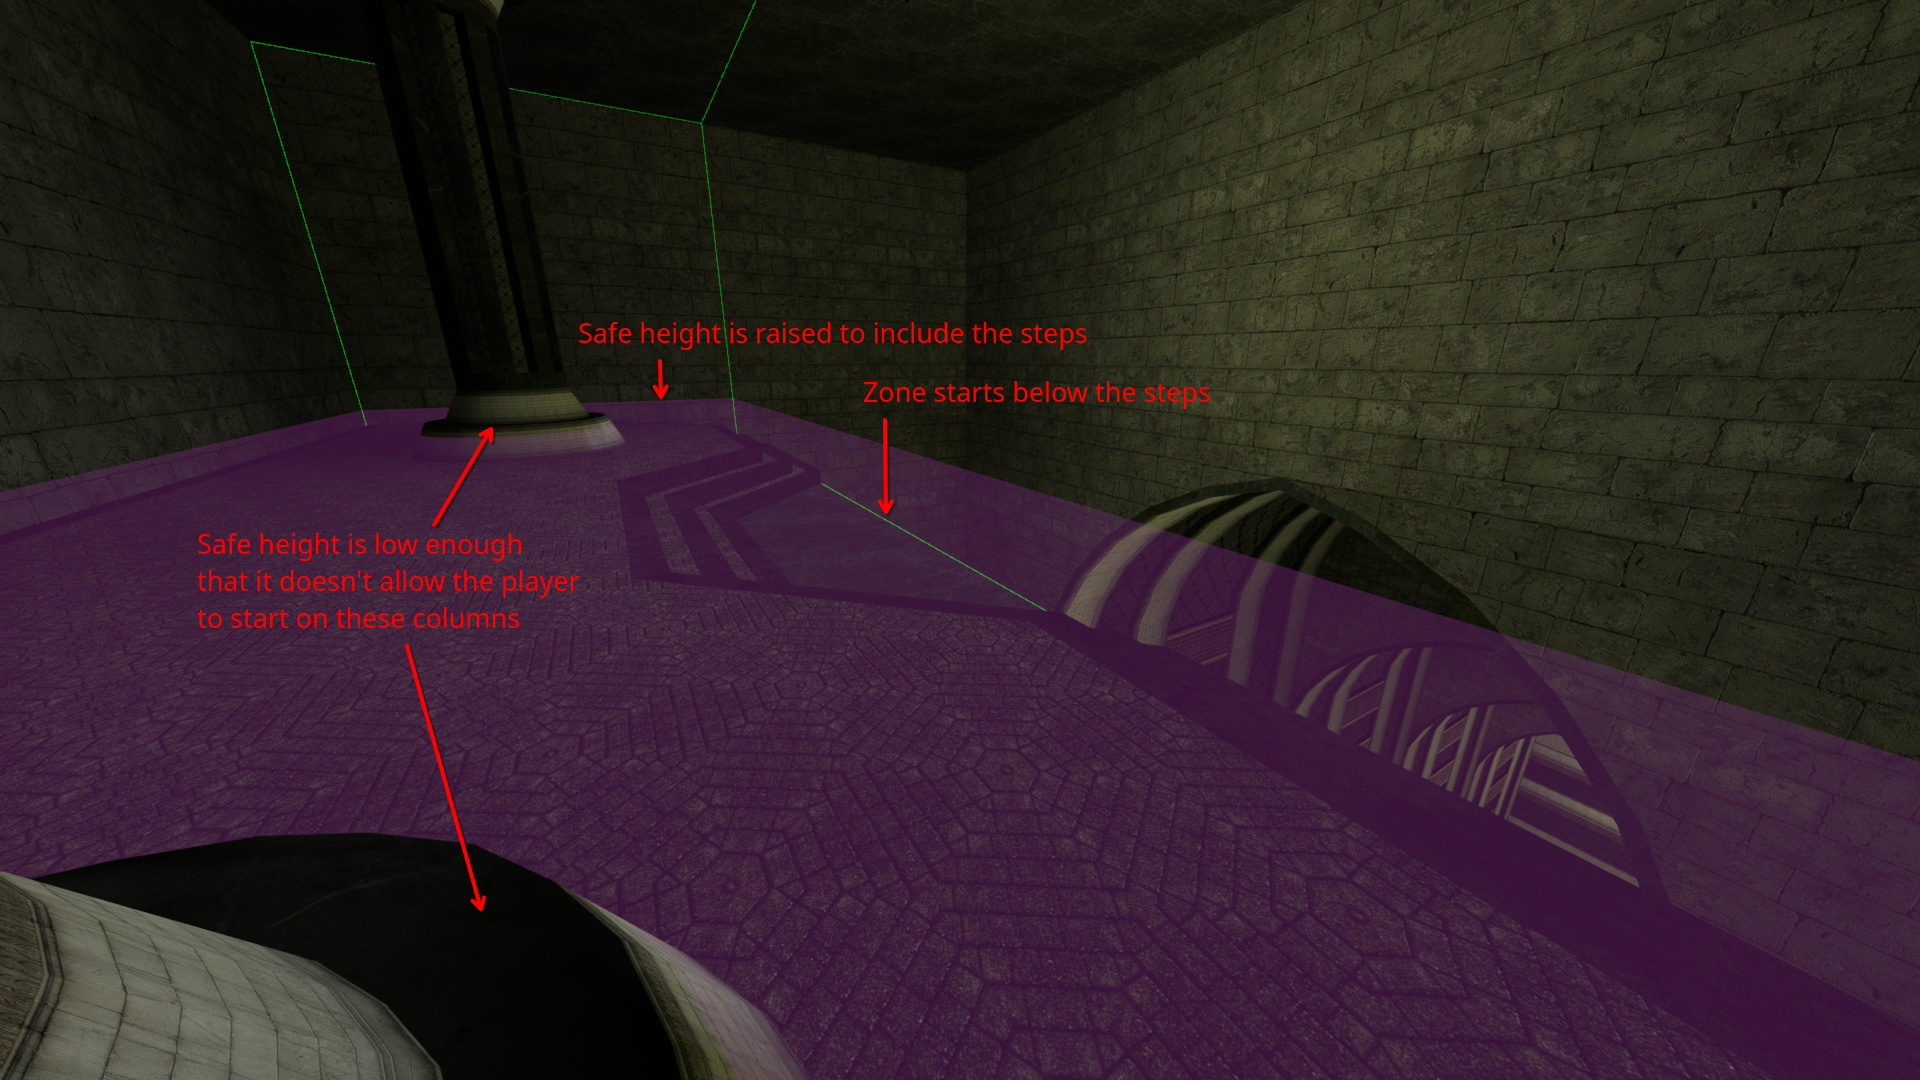
Safe Height #
The player needs to stand at or below the safe height to be able to prime the timer before starting.
This setting is generally only relevant to Surf and Bhop, other modes use Full Height by default.
Make sure that safe height encompasses any small protrusions in the start zones.
Pay special attention to zone markings on Bhop maps as those are often solid and require raising the safe height by 2-3 units.
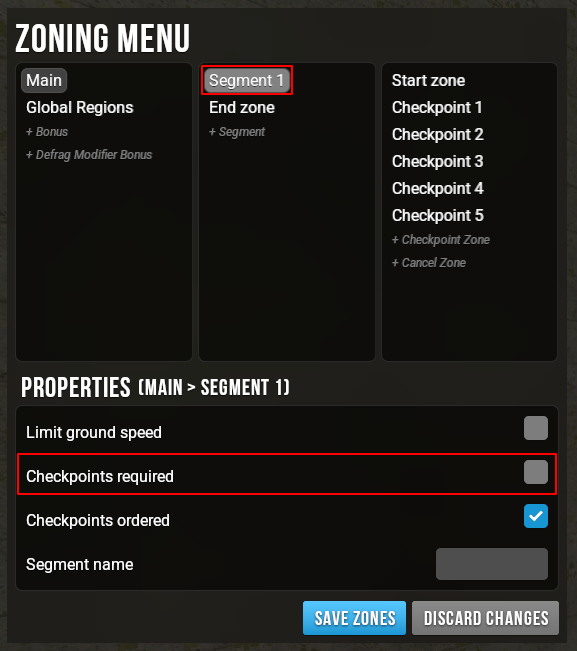
Required Checkpoints #
When zoning, you should do your best to make sure checkpoints are not skippable.
If avoiding skippable checkpoints would force an unreasonably long gap between them, it’s acceptable to make those checkpoints optional instead.
Uncheck Checkpoints Required in Segment properties to achieve this.
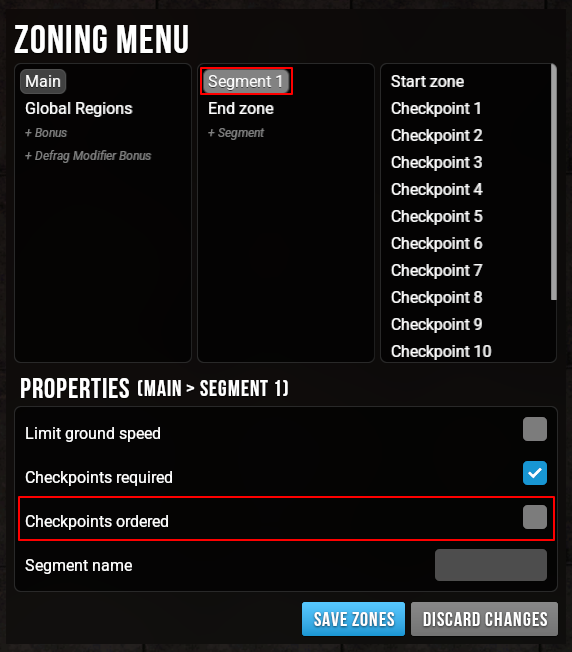
Unordered Checkpoints #
Some new maps are meant to use checkpoint zones to require players to activate certain areas to beat the map, while allowing them to route them in any order they want.
Disable the Checkpoints ordered setting for these maps.
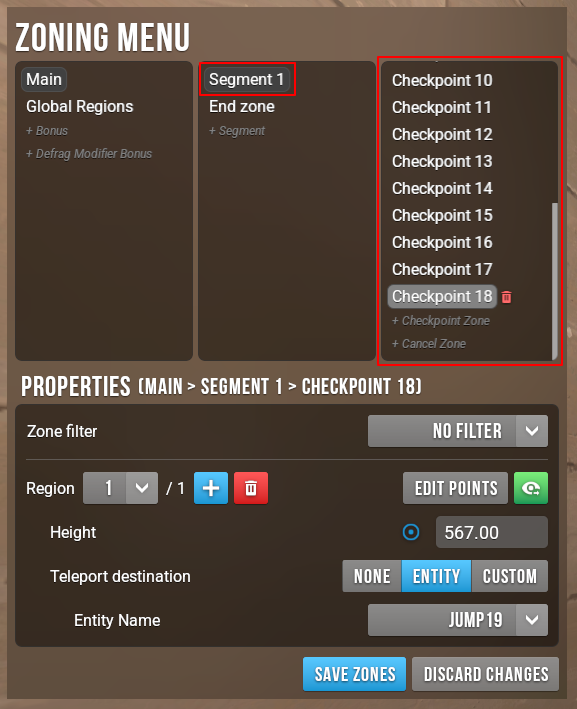
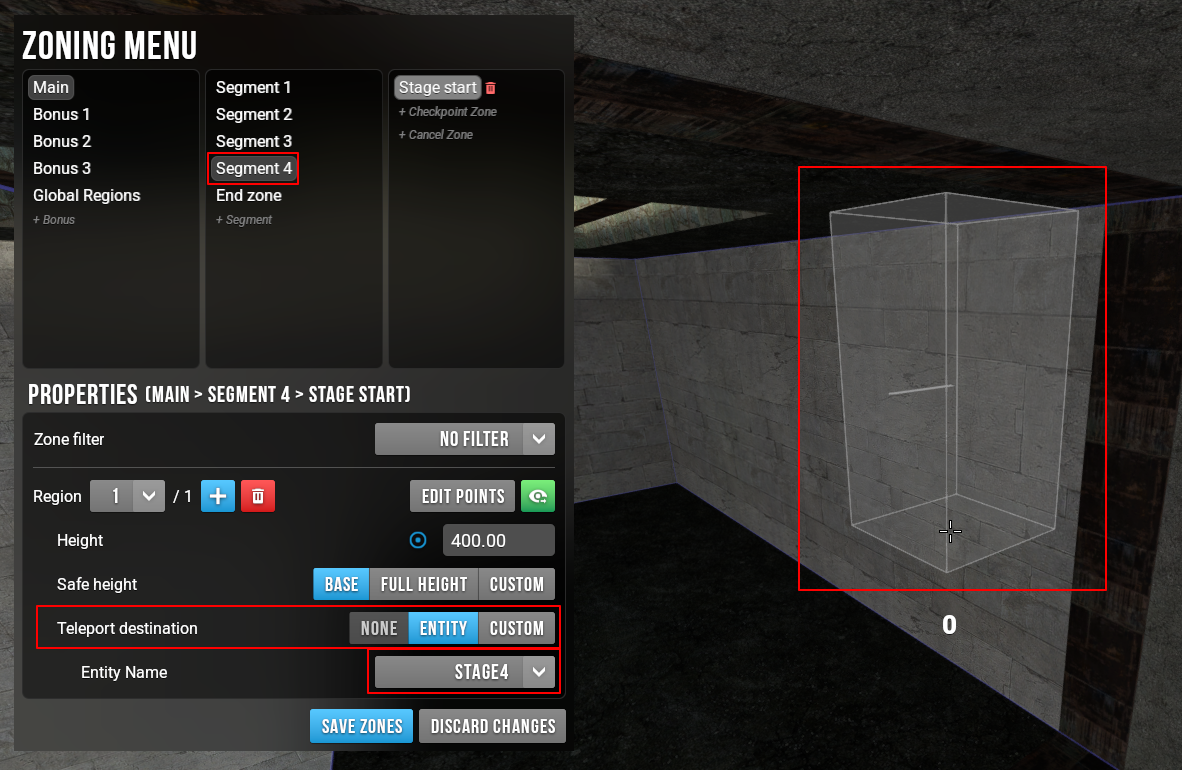
Teleport Destination #
This is the spot player will be teleported to when restarting a run/stage.
Original teleport destinations set by the mapper are highly preferred over custom ones.
If the zone encompasses a teleport destination during creation, it will be automatically selected.
Sometimes multiple teleport destinations will be present in one zone, choose the one the map sends the player to when they fail a section.
In rare cases when you have to create a custom one:
- Click Custom in the Teleport Destination section
- This will automatically create it at the center of your zone
- Select the angle of the teleport by looking in the desired direction and left clicking
- By default angles snap to 45 degress, you don’t need to be very precise
- If you need to, edit the position by clicking the blue button next to position
Filters #
Maps sometimes block players from progessing before certain triggers are hit.
In Momentum Mod additional protection should be given to zones, by disabling them unless the player meets filter conditions.
TODO: Mention negated filters when that’s implemented.
TODO: Find a map where this could be demonstrated easily with a screenshot/video
Other Zoning Concepts #
Freeform Mode #
Freeform Mode allows for creation of polygonal zones.
Click Middle Mouse Button while zoning to switch between modes.
Box Mode #
Box Mode allows for creation of zones in mid-air, when there is no geometry to rely on.
Start by placing the box in the air and then edit it to expand the zone as needed.
To switch to this mode, click the Middle Mouse Button twice while zoning, before placing any points.

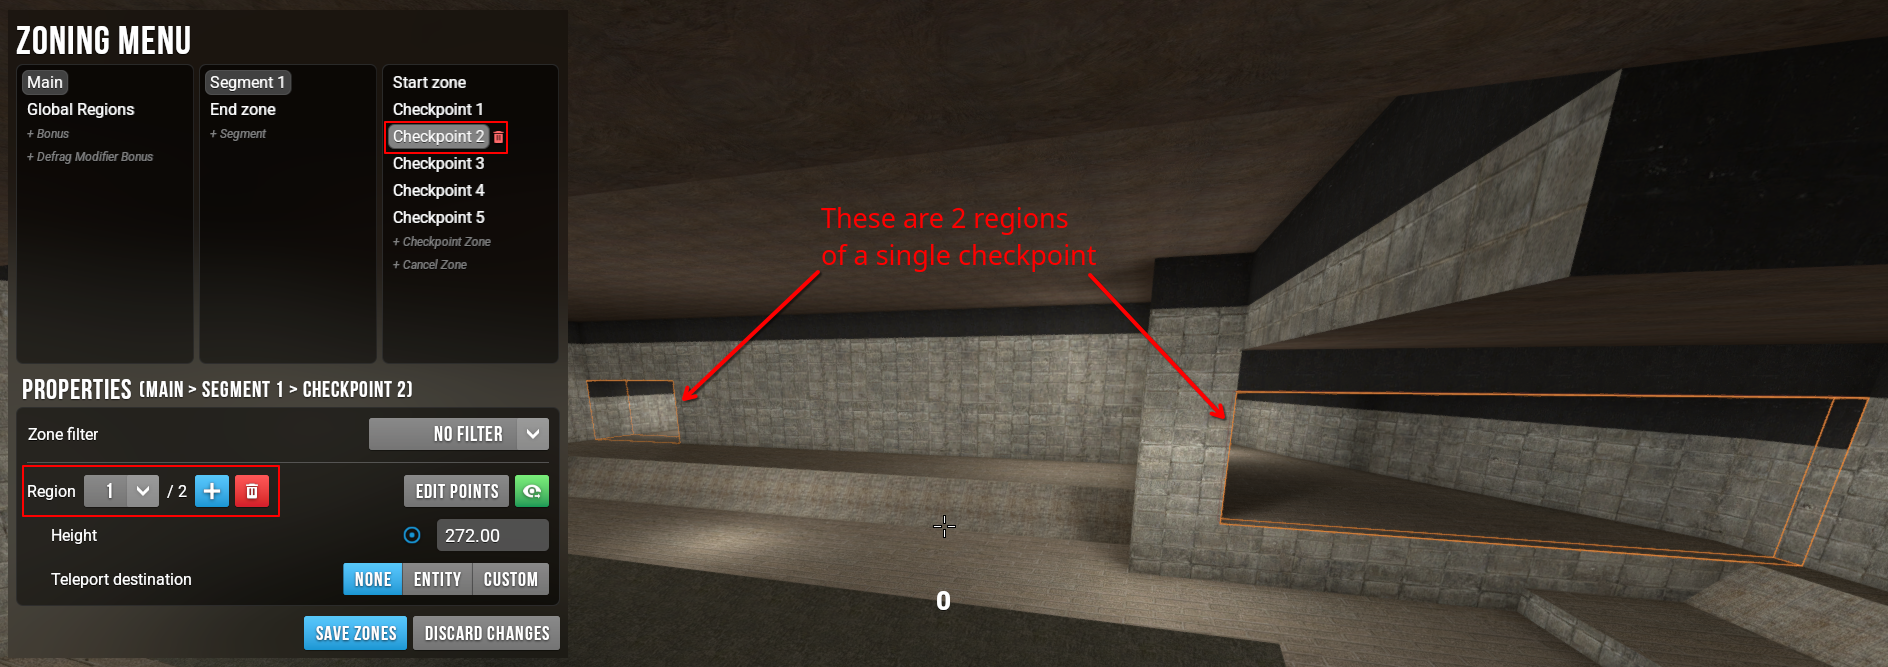
Multiple Regions #
Every zone can have multiple, disconnected regions.
This can be used to zone multiple routes, starting points, ends, or to create holes in zone geometry.
Click the + button in zone properties to add a region.
- Regions should never overlap
- Regions should not touch if it’s possible to connect them into a single zone
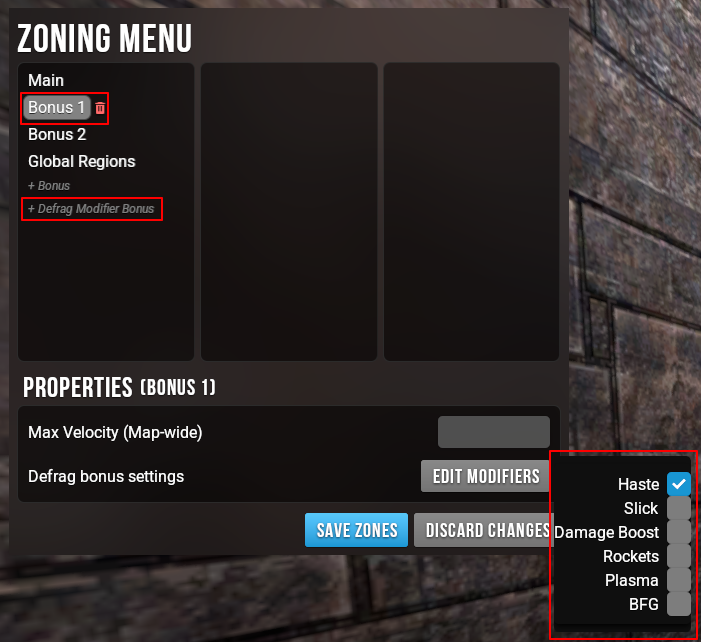
Defrag Modifier Bonuses #
Bonuses in Defrag require a different approach than in other modes.
They use the same zones as the Main Track, but apply modifiers to the player.
Clicking on +Defrag Modifier Bonus will create the bonus and allow for editing specific modifiers.
Zone Editing #
Any zone can be edited after it’s creation.
Simply click the Edit Points button and choose the point you want to edit.
- Corners - Allow you to edit the XY position of an individual vertex
- Edges - Allow you to create additional vertices
- Sides - Allow you to move a side along it’s axis
- The zone must be a rectangle to use this option.
- The zone must be a rectangle to use this option.
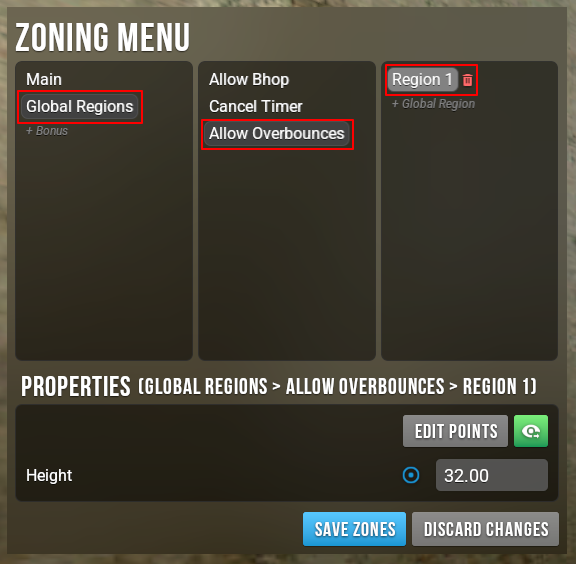
Global Regions #
Allow Bhop #
This zone allows the player to bhop without losing speed when they normally wouldn’t be able to.
While this can be used in every mode it’s mostly relevant to Surf.
Autohop in Surf is disabled by default.
On Surf maps You should add Allow Bhop zones to every non-gameplay area, end of stage platform and any platform that should be bhopped on mid-stage
Allow Bhop zones should be at least 16u tall or extend at least 16u above the highest point of a slanted surface.
While they are not visible by default it’s important to make them look good for players that choose to have them visible.
Both 16u and 32u are standard heights for flat surfaces depending on which looks better.
Non-gameplay areas are generally fully surrounded with the Allow Bhop zone going up to the ceiling/skybox.
On some End platforms matching the End Zone height looks the best.
While the aesthetics are very subjective and strict rules aren’t enforced, please keep what you’re doing consistent.
Non-gameplay areas are any areas that aren’t available when running the map. They include hubs, secrets, end rooms etc.
The effects of “Allow Bhop” Zones as well as the “Force Enable Bhop” property are not active while in zoning mode.
Example: surf_kvas zones (hub area is fully surrounded with the Allow Bhop zone extending all the way to the skybox).

Allow Overbounces #
Only applicable to Defrag.
In Momentum Mod overbounces are disabled by default.
In order to enable them create Ovebounce Zones.
Hammer Zoning #
If you would rather zone maps in Hammer, follow this guide instead.
Hammer Zone Entities #
Open the vmf file for the map that you want to zone and go to the start area. Place a zone_timer_start trigger in the area where you want the start zone to be and set the “Restart Destination” field to the destination where you want the player to start.
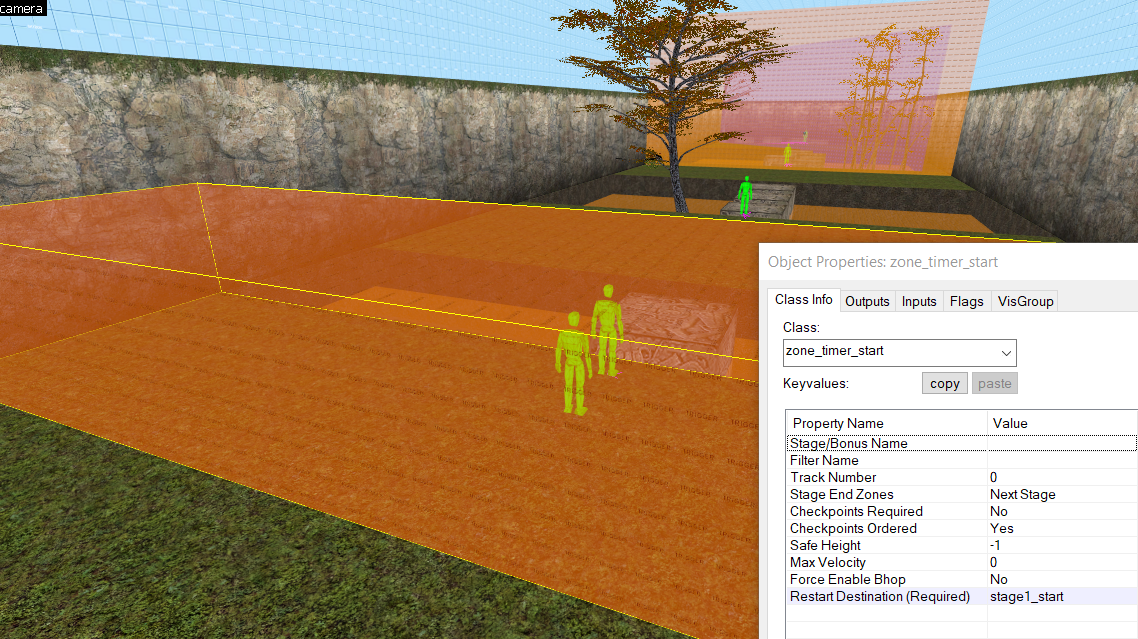
If you are zoning a staged map, use zone_timer_stage triggers for the stage start zones (starting at stage 2). For linear maps, use zone_timer_checkpoint to add checkpoints throughout the map. Use zone_timer_end for the map end zone.
Bonus Tracks #
Bonuses can be created by using a zone_timer_start trigger and setting the “Track Number” property to the bonus number. Bonuses cannot have stages, but they can have checkpoints. The zone_timer_checkpoint and zone_timer_end triggers also need to have their “Track Number” set to the bonus number.
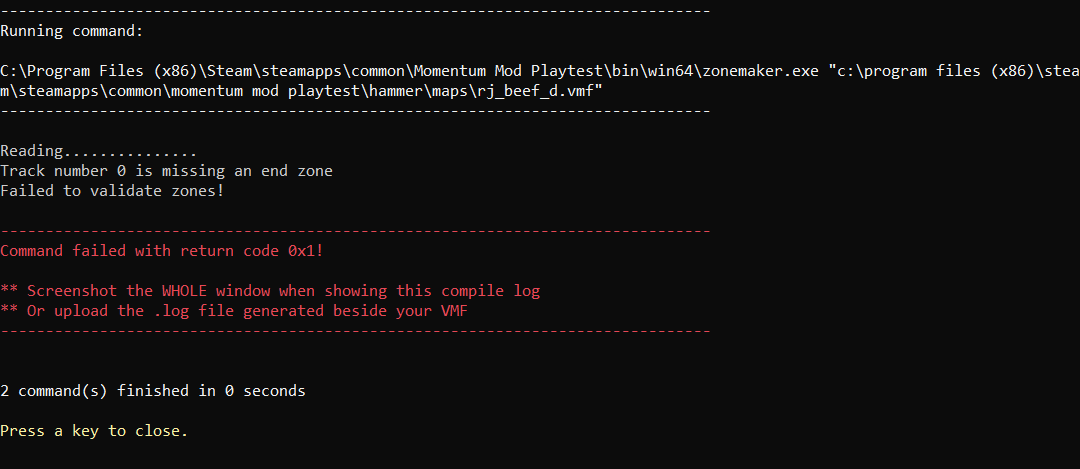
Generating Zones with ZoneMaker #
After all of your zones are set up, you can generate the zones by running zonemaker.exe on the vmf. Strata Hammer will have this tool included in the compile options:
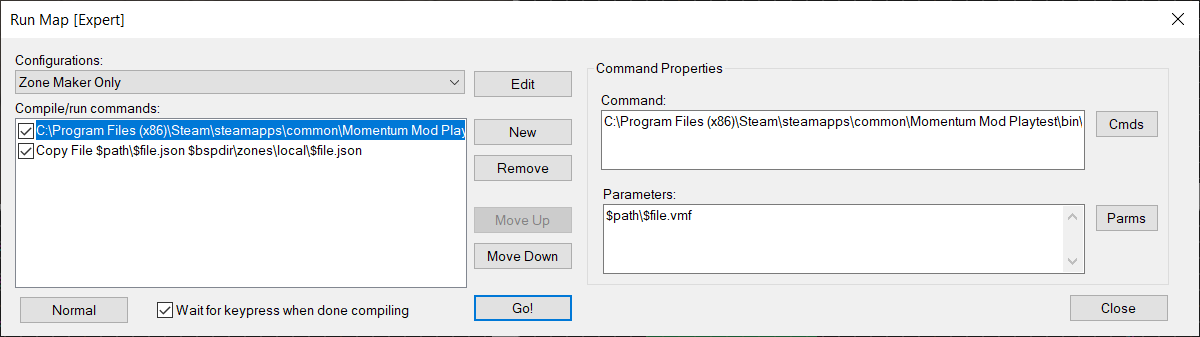
If there is a problem with how your zones are set up, ZoneMaker will fail and display an error in the compile log: